
Quilting, without question, blends precision, creativity, and tradition into a single craft. Among the many timeless designs available, the Jacaranda Star quilt pattern stands out for its balance of geometric structure and visual softness. Moreover, this pattern appeals to both confident beginners and experienced quilters who enjoy clean lines paired with striking star symmetry.
In this guide, you will learn how to make a Jacaranda Star quilt pattern from start to finish. Throughout the process, each step flows logically into the next, ensuring clarity, originality, and a smooth learning experience.
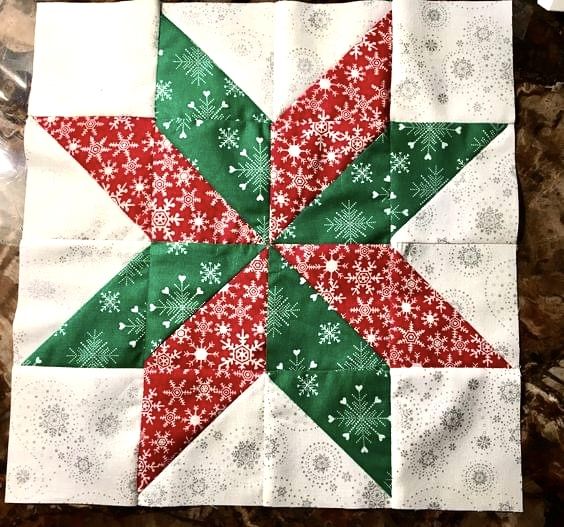
Understanding the Jacaranda Star Quilt Pattern
First of all, the Jacaranda Star pattern is characterized by repeated star blocks arranged in a harmonious grid. Unlike overly complex star quilts, this design emphasizes proportion and contrast rather than excessive piecing. As a result, the pattern feels elegant, structured, and timeless.
Additionally, the Jacaranda Star layout allows flexibility in color placement. Therefore, quilters can adapt the pattern to modern, traditional, or minimalist styles without altering the core construction.
Materials and Tools You Will Need
Before cutting any fabric, preparation is essential. Having the right materials ready ensures accuracy and efficiency from the beginning.
You will need:
- High-quality quilting cotton
- Rotary cutter and cutting mat
- Quilting ruler (clear acrylic preferred)
- Sewing machine with a quarter-inch foot
- Coordinating thread
- Iron and ironing board
- Safety pins or quilting clips
Choosing stable cotton fabrics is especially important. Consequently, your star points remain sharp, and block alignment stays consistent. For inspiration on fabric coordination techniques, many quilters explore resources like “decoratindreams.com/quilting-basics” for complementary ideas.
Choosing Fabrics and Color Placement
Color selection plays a major role in the final impact of a Jacaranda Star quilt. Typically, each star block uses:
- One dominant star color
- One background fabric
- One contrasting accent fabric
By maintaining contrast between the star and the background, the pattern becomes more visually defined. Furthermore, limiting the palette prevents the quilt from appearing overly busy.
At this stage, it is helpful to lay out fabrics before cutting. Doing so allows you to preview balance and symmetry while making adjustments early.
Cutting the Fabric Accurately
Once fabrics are selected, accurate cutting becomes the foundation of the entire quilt. Therefore, take time to measure carefully and cut consistently.
Generally, Jacaranda Star blocks rely on squares and half-square triangles. To ensure precision:
- Square up fabric edges before cutting
- Use consistent seam allowances
- Label pieces if working with multiple colors
Because star patterns rely heavily on alignment, even small inaccuracies can affect the final layout. As a result, patience during this stage pays off later.
Assembling the Jacaranda Star Blocks
After cutting, block assembly begins. Start by constructing the half-square triangles, pressing seams flat after each step. Next, arrange the units according to the star layout.
At this point, it helps to assemble blocks row by row. Consequently, alignment remains controlled, and seam intersections stay clean. Pinning intersections lightly also improves accuracy without slowing progress.
As blocks are completed, square each one to the same size. This step, although often skipped, ensures the quilt top assembles smoothly.
Arranging the Quilt Top Layout
With all star blocks finished, lay them out on a flat surface. This stage allows you to evaluate spacing, color flow, and overall balance.
By alternating star orientation or background tones, subtle movement emerges across the quilt top. Additionally, stepping back periodically provides a clearer perspective before final assembly.
Once satisfied, join the blocks into rows, then connect the rows to complete the quilt top.
Quilting and Stitching Options
After the quilt top is assembled, layer it with batting and backing fabric. Then, choose a quilting method that complements the star design.
Popular options include:
- Straight-line quilting to emphasize geometry
- Echo quilting around star points
- Gentle crosshatch designs
Straight-line quilting often works best for Jacaranda Star quilts, as it reinforces structure without overwhelming the pattern. Many quilters reference technique breakdowns from trusted quilting education sources like “quiltersguild.org/learn-to-quilt” for stitch planning.
Binding and Finishing Touches
Once quilting is complete, trim excess batting and backing evenly. Then, attach the binding using a consistent seam allowance.
For durability, machine-stitch the binding to the front and hand-finish the back. This approach provides strength while maintaining a clean appearance.
Finally, give the quilt a light press and inspect all seams. These finishing details enhance both longevity and visual polish.
Common Mistakes to Avoid
Although the Jacaranda Star pattern is approachable, a few mistakes can disrupt the final result:
- Inconsistent seam allowances
- Low-contrast fabric choices
- Skipping block squaring
By addressing these issues early, the quilting process remains smooth and predictable.
Why the Jacaranda Star Pattern Endures
The lasting appeal of the Jacaranda Star quilt pattern lies in its versatility. It adapts effortlessly to seasonal palettes, modern interiors, and traditional settings. Moreover, its structured design makes it ideal for skill-building while still producing a striking finished piece.
Final Thoughts
In summary, learning how to make a Jacaranda Star quilt pattern offers a rewarding balance of technique and creativity. With careful preparation, thoughtful fabric choices, and steady assembly, this pattern delivers a quilt that feels both classic and contemporary. Most importantly, the process encourages precision while leaving room for personal expression.