
Kitchens accumulate small imperfections over time. Scratched stove knobs, faded oven handles, and dull metal surfaces are common signs of daily use. A crochet flower stove knob and oven handle cover is a simple way to refresh these worn spots while adding a handmade, cottage-style touch to the kitchen. This guide walks through everything needed to design, measure, and stitch a set that fits properly and holds up to regular use.
Why Crochet Covers Work So Well in the Kitchen
Fabric or crochet covers are popular among home crafters for a few practical reasons, not just decoration.
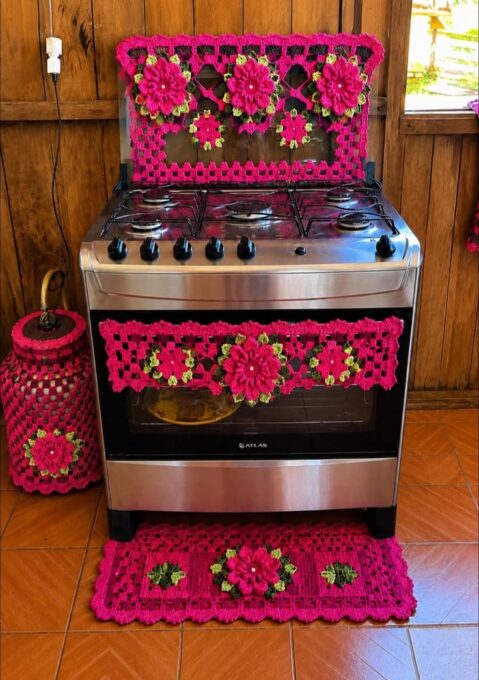
- They protect metal or plastic knobs from grease, heat splashes, and fingerprints.
- They soften sharp edges on oven handles, which is useful in households with children.
- They allow easy customization to match seasonal themes or existing kitchen colors.
- They are quick, low-cost projects that use minimal yarn, making them ideal for scrap yarn stash.
Unlike printed silicone covers sold in stores, a crocheted version can be resized, restyled, or replaced in minutes once a stitch pattern is memorized.
Materials Needed
Before starting, gather the following supplies. Quantities will vary depending on how many knobs or handles are being covered.
| Item | Recommended Type | Notes |
|---|---|---|
| Yarn | Cotton, worsted weight (Size 4) | Cotton withstands heat and washing better than acrylic |
| Crochet hook | 3.5mm–4.5mm (E to G) | Adjust based on yarn thickness and desired tightness |
| Stitch marker | Any style | Helps track rounds in the flower motif |
| Scissors | Small, sharp | For clean yarn cuts |
| Yarn needle | Blunt tip | For weaving in ends |
| Measuring tape | Flexible | To size the knob or handle accurately |
Cotton yarn is generally preferred over acrylic for stove-adjacent projects, since it tolerates warmth from nearby burners better and can be laundered more easily. Acrylic can work for oven handle covers that stay farther from direct heat, but caution is still recommended. For readers unsure which yarn weight or hook size pairs best together, the Craft Yarn Council’s standard yarn weight system offers a reliable reference chart used across the crochet community.
Measuring Your Stove Knobs and Oven Handle
Accurate measurements prevent the finished piece from being too loose or too tight.
- Measure the diameter of the knob at its widest point.
- Measure the depth, from the base to the front face of the knob.
- For the oven handle, measure its circumference and total length.
- Add roughly 10% to these numbers to allow for stretch and stitch tension.
Because knob shapes vary between stove models — some are cylindrical, others tapered or oval — a swatch test is worth the extra few minutes. Crocheting a small sample and checking it against the actual knob avoids unpicking a finished project later.
Step-by-Step: Crochet Flower Motif for the Knob Cover
This section explains the general construction logic behind a flower-topped knob cover rather than a single rigid pattern, since hook size and yarn weight will shift stitch counts slightly.
Step 1: Foundation Ring
Start with a magic ring (adjustable loop). Work 6 single crochet stitches into the ring, then pull the tail to close it. This becomes the flower’s center.
Step 2: Building the Petals
Round 2 typically works petals directly into each single crochet from Round 1. A common approach:
- Chain 2, then work 1 double crochet, 1 half double crochet, and 1 single crochet into the same stitch to form one petal.
- Slip stitch into the next stitch to move to the base of the next petal.
- Repeat around until six petals are complete.
This structure creates a rounded, layered flower shape without sharp points, which sits comfortably on top of a knob.
Step 3: The Body (Cover Sleeve)
Once the flower cap is finished, the sleeve portion is worked separately or continued directly from the flower’s outer edge, depending on preference.
- Chain a foundation row matching the measured circumference of the knob.
- Join with a slip stitch to form a ring, being careful not to twist the chain.
- Work single crochet in rounds until the sleeve reaches the measured depth.
- Fasten off, leaving a long tail for attaching the flower cap.
Step 4: Assembly
Place the flower cap over the open end of the sleeve and stitch it in place using a whip stitch and the leftover yarn tail. Weave in all remaining ends securely, since loose threads near a stove pose both a tidiness and safety concern.
Adjusting the Pattern for Oven Handles
Oven handle covers follow similar logic but are worked as a flat rectangle rather than a round sleeve.
- Chain a length matching the handle’s circumference plus a small seam allowance.
- Work rows in single crochet or half double crochet until the piece matches the handle’s length.
- Fold the rectangle around the handle and seam the long edge closed.
- Add small flower motifs along the seam or at each end as accent pieces, following the same petal method described above.
Some crafters prefer a drawstring-style closure using a length of matching yarn threaded through the top and bottom edges, which allows the cover to be removed easily for washing.
Tips for a Better Fit and Longer Lifespan
A few adjustments make a noticeable difference in how the finished cover performs over time.
- Use a slightly smaller hook than recommended on the yarn label. This creates a tighter fabric that resists sagging around the knob.
- Avoid placing covers directly on burner-adjacent knobs that get warm during cooking. A short buffer zone from direct heat extends the yarn’s lifespan.
- Wash covers by hand or on a gentle cycle to prevent shrinking, especially with cotton yarn.
- Reinforce stress points, such as where the flower cap meets the sleeve, with an extra round of single crochet if the cover will see frequent handling.
Common Mistakes to Avoid
| Mistake | Result | Fix |
|---|---|---|
| Skipping the swatch/gauge check | Cover too loose or tight | Test fit before finishing the full piece |
| Using acrylic near direct heat | Yarn may soften or discolor | Choose cotton for heat-adjacent knobs |
| Leaving yarn tails unwoven | Fraying and unraveling over time | Weave in ends with a yarn needle |
| Ignoring knob shape variation | Uneven, ill-fitting cover | Measure depth and diameter separately |
Styling Ideas
Flower stove knob covers pair naturally with matching oven handle covers, creating a coordinated kitchen set. Some popular variations include:
- Two-tone petals using a contrasting center color
- Seasonal color palettes, such as pastel spring shades or deeper autumn tones
- Mixed motif sets, combining flowers with small leaf accents between petals
Because the project uses small amounts of yarn, it’s an efficient way to use up leftover skeins from larger projects. Readers building out a full coordinated kitchen set may also enjoy browsing our crochet kitchen accessories collection for matching dish towel holders, pot holders, and basket patterns.
Frequently Asked Questions
Is cotton yarn necessary, or can I use acrylic? Cotton is generally the safer choice for anything positioned close to stove heat, since it holds up better under warm conditions and is easier to wash. Acrylic can be used for handle covers positioned farther from direct heat, but it should be monitored for any signs of softening.
How much yarn do I need for a full set? A typical four-knob set plus one oven handle cover usually uses under 100 grams of worsted weight cotton yarn, though this depends on knob size and stitch density.
Can I make the flower cap bigger or smaller? Yes. Adding an extra round of petals, or working the initial ring with more starting stitches, increases the flower’s diameter. This is useful when knobs vary in size across a single stove.
Will the cover interfere with turning the knob? If sized correctly with enough stretch, no. It’s best to test the fit before fully securing the sleeve, especially around the base where the knob rotates.
Is this pattern beginner-friendly? Yes. It only requires basic stitches — single crochet, half double crochet, double crochet, and slip stitch — making it approachable for someone with a few finished projects under their belt.
How do I clean a finished cover? Hand washing with mild soap and laying flat to dry is the safest method, particularly for cotton, which can lose shape if machine dried on high heat.