

There is a specific kind of satisfaction that comes from starting a project after lunch and holding a finished amigurumi in your hands before dinner. Small amigurumi is one of the few crochet crafts where that turnaround is realistic, even for someone who is not a fast crocheter. The trick is not speed for its own sake — it is choosing the right size, yarn, and pattern structure so the project is actually built for a short timeframe.

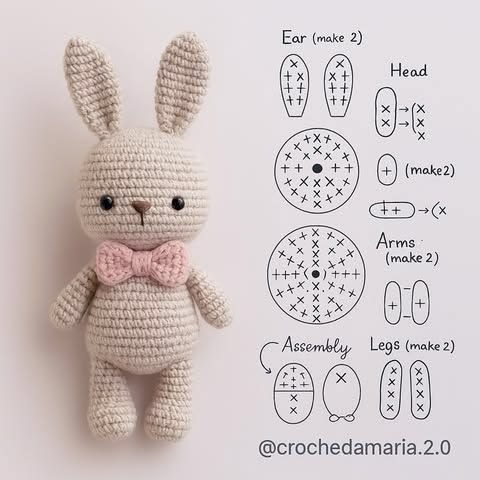
I have made dozens of small amigurumi in single sittings, from 3-inch mushrooms to tiny 4-inch bears, and the pattern that works is fairly consistent. This guide walks through exactly how to crochet small amigurumi in one afternoon, including realistic time estimates for each stage.
What “Small Amigurumi” Actually Means
For a single afternoon session (roughly 3 to 5 hours), “small” generally means a finished piece between 3 and 5 inches tall, made with worsted weight yarn and a 3mm to 3.5mm hook. Anything larger, or made with fine sport-weight yarn, usually pushes past a single afternoon simply because of the stitch count. Choosing the right scale from the start is the biggest factor in whether you finish on time.
Step 1: Choose a Pattern With Simple Shaping
Look for patterns with few pattern pieces (ideally 3 to 5: body, head, arms, ears), basic increase and decrease shaping rather than complex color work, a body under 5 inches, and one or two colors. Tiny accessories like hats or bows look cute but add sewing time — save those for a project with more time available.
Step 2: Gather Your Materials First
Nothing slows a session like stopping to search for stuffing or a stitch marker halfway through. Lay out your hook, yarn, fiberfill, safety eyes, yarn needle, and scissors before you sit down. If you are unsure what you need, our breakdown of essential amigurumi tools in <a href=”/essential-amigurumi-tools”>this guide</a> covers the full list.
Step 3: Crochet the Body First
The body is usually the largest piece and benefits most from an uninterrupted stretch of focus. Work in continuous spiral rounds, using a stitch marker to track your round start.
| Piece Size | Approximate Time |
|---|---|
| Small body (12–18 rounds) | 45–60 minutes |
| Head (if separate from body) | 30–40 minutes |
| Arms or legs (pair) | 20–30 minutes |
| Ears or small details | 10–15 minutes |
Stuff the body as you close the final rounds rather than all at once at the end — this gives a more even shape and is faster, since you are not fighting to push fiberfill through a nearly closed opening.
Step 4: Make the Smaller Pieces
Arms, legs, and ears are quick because they use far fewer stitches. This is a good stage to batch your color changes if your design uses more than one color, since switching yarn once for multiple pieces is faster than switching back and forth.
Step 5: Assemble and Sew
This is the step most beginners underestimate. Use T-pins to position limbs and check proportions before sewing anything permanently. Sew with a whip stitch or mattress stitch using your yarn needle, working in small, tight passes. Attach safety eyes before you fully stuff and close the head, since you cannot install them once the piece is sealed.
Step 6: Final Touches
Weave in remaining ends, trim loose threads, and gently squeeze and roll the stuffed body to distribute the fiberfill evenly if any lumps have formed.
A Realistic Afternoon Timeline
| Time | Task |
|---|---|
| 0:00–0:25 | Choose pattern, gather materials |
| 0:25–2:00 | Crochet the body and head |
| 2:00–3:00 | Crochet arms, legs, and small details |
| 3:00–3:45 | Sew pieces together, attach safety eyes |
| 3:45–4:00 | Weave in ends, final shaping |
This adds up to roughly 4 hours, leaving a comfortable buffer even with a coffee break or two.
Tips to Actually Finish in One Sitting
- Pre-wind your yarn into a center-pull ball so it feeds smoothly without tangling.
- Avoid frogging perfectionism. A slightly uneven stitch on a 4-inch amigurumi is rarely visible in the finished piece.
- Keep a small dish for stitch markers and pins so nothing rolls off the table mid-project.
- Play a show or podcast you do not need to watch closely; the repetitive stitching keeps focus without breaking your rhythm.
If you want project ideas naturally suited to this timeframe, our list of simple one-color amigurumi projects for beginners in <a href=”/simple-one-color-amigurumi-projects-for-beginners”>this article</a> is a good next stop, since single-color patterns cut down on both crocheting and finishing time.
Frequently Asked Questions
Can a true beginner finish an amigurumi in one afternoon? Yes, as long as the pattern is simple and the piece is small (under 5 inches). Beginners should expect the process to take closer to 5 hours, since stitch speed increases with practice.
What yarn weight is fastest for small amigurumi? Worsted weight (medium, category 4) yarn paired with a 3mm to 3.5mm hook is the fastest realistic combination, covering more area per stitch without sacrificing the tight gauge amigurumi needs.
Is it better to crochet the head and body separately or as one piece? For speed, crocheting them as a single continuous piece saves both crochet and sewing time, since you eliminate one seam entirely.
What is the biggest time-waster in amigurumi projects? Sewing and assembly, by far. Crocheting the pieces is usually faster than beginners expect, but attaching limbs neatly and symmetrically takes practice.
Should I stuff as I go or all at once at the end? Stuffing as you close the final rounds gives a more even, professional shape and is typically faster than forcing fiberfill through a small closing gap at the end.
Final Thoughts
A one-afternoon amigurumi is entirely achievable once you choose the right scale of project and prepare your materials in advance. Keep the piece small, the color count low, and your tools within arm’s reach, and you will move through each stage without the stalls that usually stretch a project across multiple days.