
. Avoid cotton balls, fabric scraps, or low-grade filling, which flatten quickly and can create visible lumps under the yarn. For firmer pieces meant to hold a pose, some crocheters also add plastic pellets to the base for weight, though this is optional and not necessary for most projects.
Step 2: Start Stuffing Early, Not All at Once
One of the most common beginner mistakes is crocheting the entire piece first and trying to stuff it through a small closing gap at the end. This makes it nearly impossible to reach corners and limbs evenly. Instead, stuff as you go:
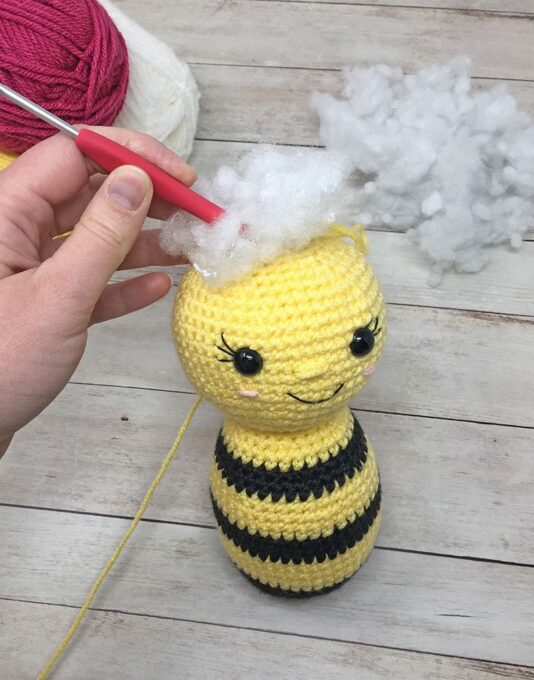
- Add fiberfill in small pinches every few rounds, especially once the piece curves inward
- Push stuffing into narrow areas like ear bases or limb tips before that section closes
- Check the shape from multiple angles as you add fiberfill, not just from the top
Step 3: Stuff in Layers, Not Handfuls
Packing one large handful of fiberfill into a piece tends to create a dense center with soft, uneven edges. Adding stuffing in thin layers, working it toward the outer edges of the piece with your fingers or a blunt tool, produces a much more even density throughout.
Step 4: Pay Extra Attention to Limbs and Small Parts
Arms, legs, and ears are the most common spots for uneven stuffing because they are narrow and harder to reach. A thin dowel, chopstick, or hemostat can help push small pinches of fiberfill all the way to the tip without leaving air pockets. Avoid overstuffing these small parts, since too much fiberfill can distort the shape or make the seam bulge.
Step 5: Check Firmness Before Closing
Before closing the final round, gently squeeze the piece. It should feel firm but not rock-hard, and it should spring back slightly when pressed. A piece that feels soft or dents easily needs more fiberfill; one that feels stiff and unyielding may be overstuffed, which can strain the stitches over time.
Stuffing Firmness Guide
| Firmness | Feel | Best For |
|---|---|---|
| Too soft | Dents and stays dented | Needs more fiberfill |
| Just right | Firm, springs back slightly | Most amigurumi pieces |
| Too firm | Rock hard, stitches stretched | Reduce fiberfill slightly |
Step 6: Close the Final Round Correctly
Use an invisible fasten-off (working through the front loops of the last round, pulling the yarn through like a drawstring) for a clean, seamless finish rather than a simple slip stitch, which can leave a visible gap or bump. Weave the tail end through a few stitches before trimming to keep it secure.
Fixing Common Stuffing Problems
- Lumpy surface: Usually caused by stuffing in large handfuls instead of thin layers. Fixable by opening the seam and redistributing the fiberfill.
- Floppy head or limbs: Often means not enough fiberfill was used, or it was not packed firmly into the base of the piece.
- Visible dents after time: Can happen with low-quality fiberfill that compresses permanently; switching to higher-loft stuffing usually resolves this.
- Lopsided shape: Frequently caused by stuffing one side more than the other; checking the piece from all angles while stuffing helps prevent this.
Good stuffing technique works hand in hand with the right supplies from the start — the fiberfill and tools covered in our guide to <a href=”/essential-amigurumi-tools” style=”color:red;”>essential amigurumi tools</a> make a noticeable difference once you get to this stage. And if you’re stuffing a piece on a time crunch, the pacing tips in <a href=”/how-to-crochet-small-amigurumi-in-one-afternoon” style=“color:red;”>how to crochet small amigurumi in one afternoon</a> account for stuffing as you go rather than saving it all for the end.
For general guidance on selecting quality craft fiberfill and safety considerations for toy stuffing, the <a href=”https://www.cpsc.gov/Safety-Education/Safety-Guides/Kids-and-Babies/Toy-Safety” target=”_blank” rel=”noopener” style=”color:red;”>Consumer Product Safety Commission’s toy safety guidance</a> is a useful reference, especially for pieces intended as gifts for children.
Frequently Asked Questions
How much stuffing does a small amigurumi need? It varies by size, but a good rule of thumb is enough fiberfill that the piece feels firm and springs back slightly when pressed, without feeling rock-hard or straining the stitches.
Can I reuse stuffing from old pillows or stuffed animals? It is not recommended, since reused stuffing is often compressed or clumped, and it can affect both the shape and hygiene of the finished piece.
Why does my amigurumi look lumpy even though I stuffed it fully? Lumpiness usually comes from adding fiberfill in large handfuls rather than small, even layers. Redistributing the stuffing in thin pinches typically resolves it.
Should I stuff the head more firmly than the body? Generally yes, since the head holds facial features and needs to maintain a clean, rounded shape, while the body can be slightly softer for a huggable feel.
What is the best tool for pushing stuffing into narrow limbs? A chopstick, thin dowel, or hemostat works well for reaching the tips of arms, legs, and ears without leaving gaps near the seams.
Final Thoughts
Stuffing amigurumi correctly is a skill that develops with practice, just like tension or stitch consistency. Stuff early and often, work in thin layers rather than handfuls, and check firmness from every angle before closing the final round. Once this technique becomes second nature, the difference in your finished pieces will be immediately noticeable — smoother, firmer, and far more professional-looking.